Quick answer
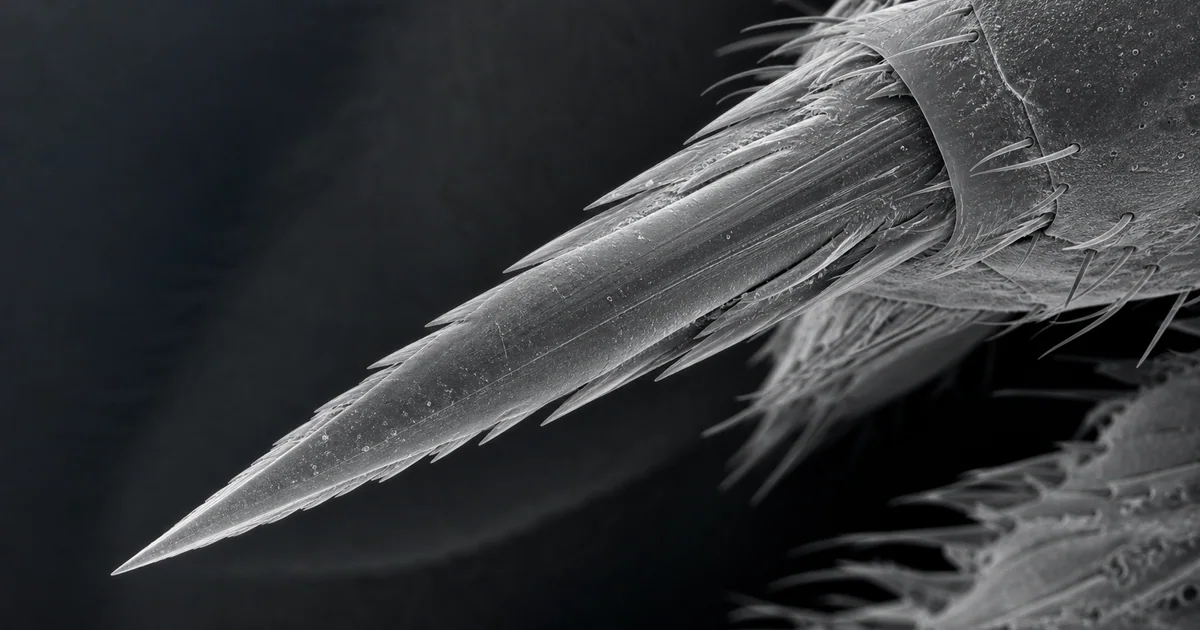
An SEM image of a wasp stinger reveals a sharp cuticular structure built for controlled penetration. At low magnification, the stinger appears as a tapered needle-like organ. At higher magnification, the surface can show grooves, ridges, sheath elements, tiny defects, and sometimes barb-like features depending on the wasp group and the exact part being imaged.
The stinger is a strong Image Atlas subject because it combines biology, mechanics, and surface microscopy. It looks dramatic, but the real value is in the details: the way a biological material forms a stiff, pointed, functional tool at microscale.
What the SEM image reveals
The most important feature is the tip geometry. SEM can show whether the tip is clean and continuous, chipped, worn, or partly obscured by biological residue. A sharp tip appears with strong edge contrast in secondary electron mode because the structure produces more surface-emitted signal at edges and high curvature regions.
Depending on preparation and orientation, the image may also reveal the stinger shaft, surface ridges, longitudinal grooves, and associated sheath structures. Some images show paired or interlocking elements rather than a simple single needle. This is important because many insect stinging structures are derived from ovipositor components and can have a more complex architecture than they first appear to have.
SEM also makes surface damage visible. A stinger that looks smooth by eye can show scratches, adhering tissue, dried fluid, or fractured cuticle under electron imaging.
Likely imaging mode
Secondary electron imaging is the likely primary mode. It is well suited to the question most viewers have: what does the surface shape look like? The signal highlights the stinger's relief, edges, grooves, and texture.
Backscattered electron imaging can be useful if the specimen has contrasting material on it, such as heavy metal coating differences, mineral particles, or embedded debris. It can also be informative if the image is part of a comparative study involving compositional contrast. For morphology alone, secondary electron imaging is usually clearer.
Low to moderate accelerating voltage is often enough for the external cuticle. The final choice depends on coating, charging behavior, desired depth of field, and detector geometry.
Sample preparation considerations
The key preparation challenge is preserving the stinger without bending, contaminating, or hiding the tip. The specimen should be mounted so the tip is visible and not buried in adhesive, carbon tape, or surrounding tissue. A small tilt can help reveal relief, but too much tilt may obscure the actual geometry of the point.
Because wasp cuticle is not reliably conductive, coating is usually needed for high-vacuum SEM. Gold-palladium and platinum coatings give strong surface conductivity and crisp detail. Carbon coating may be preferred if later EDX analysis is planned, although carbon may not give the same visual brightness as a noble metal coating.
The most common artifacts are charging, coating buildup at the tip, broken cuticle, dried residues, and mounting shadow. If the stinger is imaged after removal from the body, mechanical damage during dissection is also a real risk.
Why the structure matters
The wasp stinger is a useful example of microscale biological engineering. It must be sharp enough to pierce, tough enough to resist fracture, and integrated with muscles, glands, and control structures. SEM cannot show the whole functional system, but it can show the external morphology that makes the system physically plausible.
The structure also helps explain differences among stinging insects. Bees, wasps, and other hymenopterans can have different stinger forms, and SEM is one of the best tools for comparing those details at the surface level.
Related SEM terms
- Secondary electron imaging
- Insect cuticle
- Ovipositor
- Stinger morphology
- Edge contrast
- Conductive coating
- Biological sample mounting
- Surface artifact